http://prettylittleheart.blogspot.mk/search/label/review

Saturday, December 12, 2015

Review Avon MagiX primer and foundation

Hello everyone,
Today I am doing review on Avon primer and foundation, it's the magiX face perfecter and magiX cashmere foundation.
First let 's talk about the primer, so it has spf 20 and its colour is white, but the consistency is very unique and weird it is creamy but when you smear it on you face it gets powdery, it is definitely matt primer so it mattifies your face, and blurs your pores. The primer is fine, maybe there are some better, but no complains.
The foundation has the same weird consistency mussy like, that turns into powdery, as it says cashmere finish. The coverage is good but it transfers very easy on the clothes, and you may end up without foundation. It has no spf, it is 30 ml and it is cheap. But not worth the money because there are a lot of other good and cheap foundations on the market.

Sunday, December 6, 2015

Review Maybelline Concealer Anti-Age

Hello everyone,
Today we have another beauty review, next on the list is the best concealer ever Maybelline Age rewind, I think that there is enough said about this product but let me confirm all of that.
I have it in shade 01 light, and is the perfect color for hiding my dark circles. So it has great coverage and it is suitable for pimples and acne scars also. It has slightly pink under tone which is great for the under eye area. It is not much for highlighting but for that the fair shade would be perfect.
It does not crease, sets pretty well and it is so light weight you do not even notice it.
It's definitely worth the hipe and the best of all it is so cheap. 


Saturday, December 5, 2015

Review of Maybelline Fit Me Foundation

Hello,
Today I am going to start making reviews of products I have used.
Today on the list are the foundations of maybelline Fit Me the original and first version, and the matte + poreless.
 So I have used both of them in shade 120 classic ivory and the first difference is here in the shade, the original is much darker and orange than the matte one, the matte one is lighter and has pink under tone.
The original Fit me is dewy foundation which is suitable for dry skin type, which is me, but even though the Matte is matte foundation it is not dewy at all, it suits dry skin type also, and this is confirmed by many other users.
I have even tried to mix them because of the shades, the original I was using in the summer when I was more tanned and matched me well but then I got paler and had to sheer it down, so I tried with the matte one and loved them, I love them separately both of them and together too.
For the coverage the matte and poreless has more coverage than the Original one.
One down side for the Matte one is that it has no pump while my original had, and I tried to put the pump from the Original to the Matte one, it did not fit :(
All in all both foundations are great. Plus side is that they are around 5$
I am sorry for the dirty packaging and almost empty bottles, but here are my foundations.

Saturday, September 26, 2015

Homemade Pumpkin Spice Latte Recipe

You Will Need
  • 2 cups milk
  • 2 tablespoons canned pumpkin puree
  • 1-3 tablespoons sugar
  • 1 tablespoon vanilla extract
  • 1/2 teaspoon pumpkin spice mix (see headnotes)
  • 1/2 cup strong hot coffee
  • whipped cream
Directions
  1. Add milk, canned pumpkin and sugar to a medium saucepan and cook over medium heat until hot, but do not boil.
  2. Remove from heat and add vanilla extract, pumpkin spice mix and coffee.
Pour into two large mugs then garnish, if desired, with whipped cream and an extra pinch of pumpkin spice mix.
Also check this drinks Delicious coffee with white chocolate
Warm drinks for cold winter day

Tuesday, September 15, 2015

Hair toner, remove brasiness

If you have died your hair blonde from dark hair color you know the results you can get, you have yellow or orange hair witch was not your desired shade. There are tons of toners and purple shampoos you can buy from the market but you can also do it yourself for less money and who doesn't want that.
All you need to bye is Manic Panic Semi-Permanent Hair Color Cream - Purple Haze or some other cheap hair color that has purple undertones or blue undertones.
And than get your favorite conditioner and put a little bit of the color in a mixing bowl and a ton of conditioner, put the mix on your hair and let it seat for 15 to 20 min and wash it off with shampoo as normal.


Saturday, September 12, 2015

DIY Lip Scrub (a Lush Bubblegum lip scrub)

After borrowing my sisters Lush Bubblegum Lip Scrub a few times (it works very well at removing dry flaky skin) I thought I'd take a proper look at the ingredients and I was very shocked at the list: Caster sugar, Jojoba oil, flavour and colourings.


So basically, Lush are charging £4.75 for 25g of sugar and jojoba oil... erm... rip-off anyone? I decided I could make my own just as well, and for just a teeny tiny fraction of the price.
After a couple of attempts I came up with a very simple 'recipe' using caster sugar, walnut oil and almond extract (and some food colouring, but that was mainly to satisfy a curiosity; I wanted to match the colour of the Lush scrub)


Start off with 3 heaped teaspoons of caster sugar, then add 1 1/2 teaspoons of walnut oil. I chose walnut oil because of it's nutty, sweet scent and flavour (you could use any other oil if you prefer, I think it would work just as well)

Then I added about 3 drops of almond extract (be careful not to add too much, extracts can taste awful in larger quantities) again, other extracts will probably work just as well- pick whatever taste you like best :) And mix it all together until the sugar and oils are combined (the sugar will start to become translucent, and it'll get kind of crumbly).
I added a few drops of pink food colouring to try and colour match the Lush scrub and look! Practically identical in texture and colour!
Lush, and the DIY

I put my scrub into a little pot (this is an old carmex pot) and the leftovers in a Tupperware for storage (I made 3 batches in total, so I had quite a bit)


DIY and Lush

I worked out the pricing for my recipe, and it comes to approximately 20p for 30g; and although the packaging isn't as pretty, and it doesn't smell as sweet and bubblegummy, there's a £4.50 price difference and it scrubs my lips just as well (the textures really are EXACTLY the same) = TOTAL BARGAIN! :)

Chocolate Whoopie Pies

Chocolate Whoopie Pies for 15-25 pie depending on size.
1 3/4 cup all-purpose flour
2/3 cup dark chocolate cocoa powder (hersheys)
1 1/2 tsp baking soda
dash of salt
4 T room temperature salted butter
4 T shortening (obviously vegetable) 
3/4 cup packed brown sugar
1 room temperature egg
2 tsp vanilla
1 cup room temp milk (fat free works)

Preheat oven to 375 and line baking sheets with parchment. Sift together flour, cocoa, baking soda and salt. Cream butter, shortening and sugar til super duper fluffy. Add in egg and vanilla and mix thoroughly. Add half the milk and mix. Add half the flour and mix. Add remaining milk and mix. Add flour and mix lightly til combined. Using a springloaded little thingy. What are they called? spring loaded scoop? scooper? scoopdeedoo? Whatever. Use about a tablespoon or two of batter evenly spaced 2 inches apart. Bake for 10 minutes or til they spring back nicely like a cake would. Cool for 5 minutes and move to a wire rack. Cool completely and frost with desired filling. 
Vanilla Whoopie Pie Filling 
2 sticks softened butter
1/4 cup shortening
1 tsp good quality vanilla
2-4 T heavy cream
Powdered Sugar

Beat the butter and shortening together for a while till light. Add vanilla and beat again. Add powdered sugar until thick. So unspecific. I eyeball my frosting but I'd guess two cups? I don't know. Just go with it. Add two T cream and beat for a while. Check consistency and add more cream if needed, I needed 3 but you might not. Go with the flow. There's always more confectioners sugar and cream. or worst case you can sandwich butter inbetween and be totally ok. i wouldn't mind. who cares what everybody else thinks. pfffffft. pipe inbetween two cookies and smusch together. devour the pillowy cloud of omnomnom. repeat until gone.
you can also fill with cookie dough frosting!

Wednesday, September 9, 2015

Orange Honey Lotion Bars

Hard lotion bars are essentially the same as liquid lotion, except they are solid at room temperature. They are “activated” by the warmth of your skin, meaning once the lotion bar is applied to your skin, your natural body heat warms up the bar. This softens the bar which allows you to glide it on smoothly.
The ingredients I use are rich, softening, and moisturizing: coconut oil, olive oil, and shea butter. The beeswax I include helps harden the bars and locks in the goodness of the softening oils and butters.
These ingredients are great for sensitive skin as well, soothing rather than irritating. I have also noticed that my lotion bars last a lot longer than the pump containers I have used in the past.

Why Orange Essential Oil?

Sweet Orange Essential Oil is one of my favorites, it comes from the peel of a variety of special oranges and has a bright, energizing, and refreshing smell – which is why it has become a fast favorite of mine. Something about the smell of Sweet Orange Oil just brightens my day and clears my head.
Best of all, it makes these lotion bars smell so good! It’s the most natural citrus honey smell that is not overpowering…just refreshing and light.
Let’s make some bars!

Orange Honey Lotion Bars

Ingredients
1 1/2 Tablespoons of raw honey
2 ounces organic beeswax
2 ounces organic shea butter
2 ounces organic coconut oil
1 tablespoon olive oil (optional)
6 drops of organic orange essential oil 
Directions:
1. In a double boiler, melt together the beeswax, shea butter, and coconut oil until they become a smooth, uniform liquid.
2. Turn the heat off and add the olive oil, honey, and essential oil drops.
3. In a muffin tin lined with five cupcake liners (reusable silicone works great!), ladle the mixture evenly between the lined cupcake wells.
4. Allow to set (or harden) on the counter for 7 to 8 hours, or pop in the fridge to speed up the process.
(this recipe makes 5 bars)

Tuesday, September 8, 2015

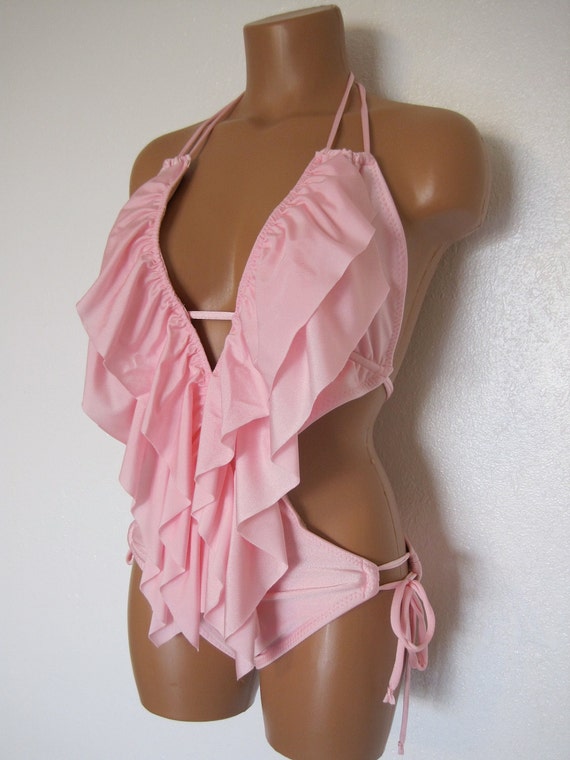
Transform your old monokini into modern hot swimsuit

Transform your old monokini into modern hot bathing suite


Kelley Jenner is know for her hot monokinies, you can be too if you have and old or your mother transform it into hot and modern bathing suite and post it on your Instagram.
Here are some ideas for you :

cut open the front of your monokini and add some riffles you would look great on the beach
cut it open and use some jewellery to keep it together 

From the cuts make some fringes ans sew them on the front opening

Monday, September 7, 2015

Copy the style of celebrity Gisele Bundechen

  Faux Shearling-Lined Biker Jacket find at

BB Dakota Women's Foster Faux Suede Jacket with Sherpa Collar, Black, Small
                                                  Suede Snow Boots
Columbia Women's Ice Maiden II Winter Boot,Black/Columbia Grey,8.5 M US
                                                 
Champion Women's Long Sleeve Jersey Tee, Black, Large
                                              Moto Sulphur Grey Leigh Jeans

Hudson Women's Leigh Boyfriend Jean, Xeric Grey Destructed, 28
                                            Butterfly Sunglasses in Black
SA106 Mod Minimal Womens Luxury Plastic Oversize Butterfly Sunglasses Black
                               Medium Signature Grain Leather Hobo Bag
Gun Tote'n Mamas - Concealed Carry Purse - Leather - Basic Hobo Handbag (Brown)

Saturday, September 5, 2015

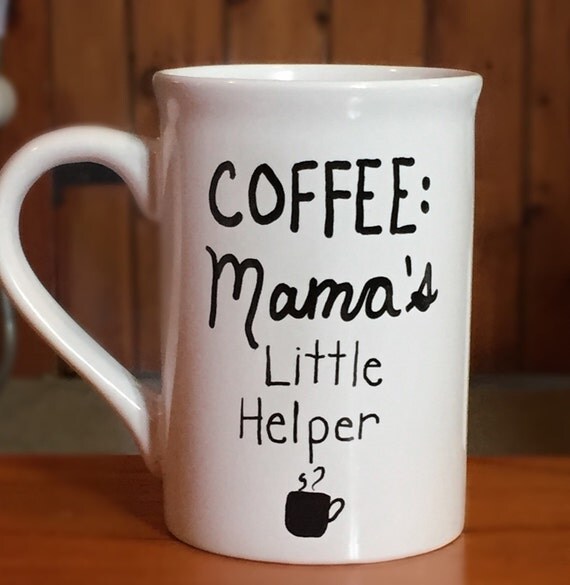
DIY Sharpie Mugs


Here is what you need:
Plain mug
Sharpie paint oil-based markers or DecoArt glass paint markers
pencil (optional)
masking tape (optional)
Step 1: Wash and dry your mug, if new.  Decide on a design and prep design with masking tape, if necessary.

Step 2: Use a pencil to rough out design for any words or lines.  Remove masking tape.

Step 3: Carefully draw design with Sharpie paint markers.
Step 4: Add accent colors, if necessary.

Step 5: Bake dishes at 350 degrees for 20 minutes to set paint; let cool completely.

Finally, remember that these will NOT be dishwasher safe!  Be sure to hand wash ONLY!
You can also look recipes for drinks to drink in your new favorite mug here :
Cheers!!!!!!!!!


The BEST Sangria

The BEST Sangria

Arugula is the star ingredient in this delicious red sangria!

Ingredients:

  • 2 (750 mL) bottles dry red wine, such as Cabernet Sauvignon or Merlot
  • 1 cup brandy
  • 1/3 cup sugar
  • 1/4 cup orange liqueur
  • 1 pound DOLE strawberries, hulled and halved
  • 3 oranges, thinly sliced
  • 3 limes, thinly sliced
  • 2 lemons, thinly sliced
  • 4 cups DOLE fresh arugula
  • (optional) 1 can lemon-lime soda

Directions:

Stir together wine, brandy, sugar and orange liqueur in large pitcher, until sugar is dissolved. Stir in the arugula, and use a wooden spoon to mull (crush) the arugula so that the flavor is released. Add strawberries, lime, lemon and orange to the wine mixture, and lightly mull the fruit to release juices.
Cover and refrigerate for anywhere from 2-24 hours. Stir in soda if desired, then strain and serve over ice.

Friday, March 13, 2015

DIY Vitamin C serum

Why Vitamin C?

Vitamin C is touted as an anti-aging and anti-wrinkle cream. Many of these products also cost an arm and a leg. Thankfully, there is a natural, homemade and inexpensive alternative that seems to work just as well. Vitamin C is helpful for brightening and tightening skin (this works if you take it internally too!).
A simple and effective Vitamin C serum that boosts skin health with natural ingredients.

Ingredients
  • ½ teaspoon natural real food Vitamin C Powder
  • 1 tablespoon distilled water OR 1 teaspoons distilled water to dissolve and 2 Tablespoons vegetable glycerine
  • a dark colored container to store (Vitamin C oxidizes easily)
Instructions
  1. Dissolve the Vitamin C powder in the water.
  2. If only using water and Vitamin C, you are done. This will store for up to 2 weeks or longer in the fridge.
  3. If using glycerine, dissolve the Vitamin C in the smaller amount of water, then stir in glycerine and store. This version will last a month or longer.
Notes
Personally, I like the pure Vitamin C and water recipe as a toner after cleansing, though glycerine is moisturizing and softening for the skin and will extend the recipe. DO NOT use glycerine on anything that is used in oral care or in the mouth as it is bad for teeth.